Pages

Tuesday, February 28, 2012

Raingutter Bookshelf Boy Style....

Who would have thought the local Home Depot would be as good as a craft store? When you are looking at home decor for a bunch of boys who are not sports minded you tend to get creative. I find myself walking down aisles at Home Depot wondering what I could do with all sorts of parts and pieces. I used pipes on a ladder, sheet metal for a coat hook, now.....
A raingutter for a bookshelf. Basic metal was the cheapest and happen to be just perfect to go with his room.
Grab some tin snips to cut it down to size, 10 feet was just a bit too long.
Now to enlist the help of dear hubby...again.....
We screwed it into the studs....
Now just add some books.
And maybe some fun magnets to hang his artwork from.
So what do you think?
Dear hubby thought I was crazy when I explained what I pictured for this room but now he rather likes it. He said he can finally grasp what I was saying. I knew he'd come around and see things my way. hehehe!
Linking up:


Ninth Street Notions
Photobucket
IhookedupwithHoHlamespice

Monday, February 27, 2012

Ladder for a Loft....

I finally got a chance to make my library ladder for Mr. T's room. We had to change things up a little bit in the end but here is the step by step.
I started with a couple of 1x2's of hardwood.
Sand around the edges to smooth them and round the corners.
They were pretty smooth so just a touch on the surface was all it needed.
After that it was time to drill the holes. I clamped them together so the holes were sure to line up.
I marked the holes 12 inches apart after starting about 7 inches from the bottom. Then just drilled through both boards.

Dear hubby stepped in to paint them. On to the assembly.
I used 3/4 inch pipe as the ladder rungs.
Then we put a cap on the end of each one.
I had hoped to have the ladder roll along in front of the closet doors but things just didn't line up like they needed to. We decided we liked it on the wall next to the closet anyway.
We lined it up with the studs in the wall but we used 18 inch pipes and since studs are usually on 16 inch centers only one side lined up. With the ladder needing to hold the weight of the boys going up and down we really needed both sides secured strongly. On the other side we added brackets that could hold 100# each.
Dear hubby helped screw it in while I held the ladder up.
I love it!
And the boys ALL love it. They have been up and down all weekend.
One happy boy up in the loft, one mom nervous. Yep time to get on that rail to prevent them from falling!

Sunday, February 26, 2012

Painting for a boy

I have been looking at this....
blank walls for a year now. I finally decided on colors. Those are the samples I was playing with on the wall. They were inspired from a volcanic flow picture.
Now to get Mr. T to pick up all the Legos....
Blank walls.....time for a transformation. Of course the first color is......
Blue.
This was the first time I have used the green paint tape. I have to say I love it!
I wish I would have had this when I painted strips in our old house.
Just look at how crisp those lines are! 
Yep, I am stuck on green paint tape.
So how did the room turn out?
Keep watching. More to come later this week!

Thursday, February 23, 2012

Spring wordart

I haven't had much time to scrapbook but making a new wordart only takes a few minutes. I have begun to enjoy it more and more. So this week I am giving you 4 new wordarts. Spring, kids and boys, just what my life if full of. It's interesting the kind of inspiration to be found in everyday. Maybe it's just that I have a bit of cabin fever myself but I am feeling the need for spring. Maybe I can get some Easter pictures done this week to use these on.

Download Spring Break HERE


Download Popcorn HERE

Download No Hands HERE

Download Brotherly Love HERE
If you like what you see, follow me. I will be posting new wordart each week.
Have fun. I hope you enjoy these. I would love to see any layouts or crafts using these. New ideas are so fun!
Linking up:

Monday, February 20, 2012

Crafty button clock

Craft time is sooo often sandwiched in between pick up and drop off of one child or another. Without a clock in my craft room I needed to keep my cell phone with me to peek at. Pinterest to the rescue again.

I saw something similar on pinterest and thought "of course!" Plus this would be easy peasy to put together.
I started with my wooden hoop.
I painted the outside hoop. I thougt of paintin the other one too but heh, it wouldn't be seen at all so I passed on that.
I made sure to find buttons that had at least 15 in the pack. There are oodles of fun buttons to choose from but I wanted something simple. And I only wanted to buy one pack. Gotta keep the cost down ya know.
Then I just used my trusty hot glue gun to attach those buttons.
What did mom do before hot glue guns? I mean really?! They come to the rescue on sooooo many projects. I find myself a tad bit impatient when I have to wait for any other glue to dry. Hot glue is just SO fast. Yep, I love it.
Ok....moving on.
Now to the clock parts. I didn't want to cut a hole for the center, the berlap would have just raveled. Instead I just pulled the weaves apart to make a gap I could wiggle the clock part through.
It worked pretty good. You can hardly even tell. Then I just added the hands and....
VOILA!
My new clock for my craft room.
I love it.
No more looking under my project supplies for my cell phone to surface. Now I can have my fun without missing the next child pick up.
I quite like it.
You should try it for your self.
They are easy and inexpensive to make.
Go ahead, have some fun!
Sharing at these great parties...
 

Thursday, February 16, 2012

4 letter words- wordart freebies

Life has been way too crazy around our house. 
I have been trying to catch up with things this week and am sad to say I haven't scrapped anything for a couple of weeks now. I can't believe how hard my goal of 365 pages this year has been. I doubt I will reach that goal but I am still trying to get as close as possible. I am hoping to get back on track, at least a little this weekend. Between extra hours at work and church and school activities I have struggled to keep up. I did however get some wordart done. I didn't have specific pictures in mind to use these with but they just seemed to go with life lately. I like to say LIFE is a 4 letter word....it is in sooo many ways right?!
So here you are. Let me know what you think. I'd love to see what you do with them also.
 Download Crazy Home Here
 Download RAWR Here
Download 4letters Here

Monday, February 13, 2012

Tracking wt loss the fun way....

Holy cow! Last week was total madness around here. I was ever so glad to see the weekend come. Unfortunatly it never lasts long enough and then it's back to work and school.
I did manage to do a couple of simple but fun crafts this weekend. I told dear hubby I needed some craft therapy and he lovingly gave me some time for just that. There is just something about this....
....that makes me smile. Being in the throws of multiple projects at the same time brings sense to all the madness of day to day life.
So I have my wellness goals set for this year. I have been working hard too. I saw this on pinterest and wanted to do it too.
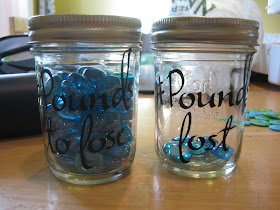
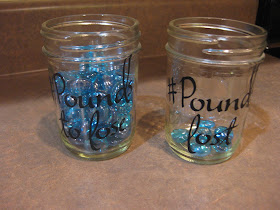
I didn't have cutesy jars but mason jars were right up my alley. Plus I have lots of them.
So I gathered my small jars, some black vinyl, and glass rocks......
....set the cricuit to pressure of 3, speed of 4. I used my Jasmine cartridge. I love this font. I find it quite versitile. Set the size to about 1.5 inches and let it go....
Now I have a visual effect for each pound I lose. Simple yet fun.
I think I will leave the lids off once I put it in my bathroom.
Here's to moving those little rocks. One week, one pound at a time!
I have another little project coming up, so stayed tuned!
Plus I have some great ideas for wordart for this week!
You will have to wait until Thursday for that!
See you all then.