Showing posts with label DIY. Show all posts

Thursday, August 28, 2014

How to make an Easle

Pin It
Project 18 of 52
I needed a way to display information to the girls during camp. After going up for pre-camp clean up I realized there were not many trees to hang signs from. There were plenty of trees, just not in the right spot for signs. So I set out to make my own. I mean, how hard can an easle be to make right!?!
RIGHT!
Here's what I did:
Supplies: 1x4x8 boards (I think I got 3)
Gorilla glue
screws 2" I think
Hardboard
 Corner brackets
Hinges
spray paint
I wanted this to be about 5 feet tall. I wanted it to be a focal point in our camp. Something everyone would see easily. I cut 2 1x4 boards 5 feet. The cross boards are 16 3/4 inches. I found the easiest way to mark the small boards was to lay them across and mark from inside of one long board to the inside of the other board.
Then use gorilla glue or wood glue to secure it to the hardboard. We clamped each board and let it dry over night to be sure it was secure. 
After gluing each side we put the corner brackets on. I wanted added support at each corner so as it gets tugged on it won't split at the weak corners.
My sweet hubby wanted to surprise me and helped to finish it from here so I missed some pictures, but I was so thankful for his help. He used basic hinges secured to the top so that it would fold flat. 
Then I got to paint it. A bright Krylon Turquoise worked well. I used a whole can but had great coverage.
I didn't bother spray painting the outside of the hardboard. Instead I used my chalkboard paint for it. You just paint the chalkboard on, wait for it to cure a couple of days then rub chalk over the whole thing to prep the board. Each time we use it it wipes off easier but at first it doesn't wipe off well.
One side was for writing notes.....
I screwed decorative clips to the other side to hold our menu and schedule for each day.
I love how it turned out. I wanted to put a chain across the side to prevent it from slipping but it's heavy enough we didn't have that problem. I also thought about a tray for the chalk but didn't get that done. Being relatively flat made it travel nicely packed in the pickup. 
Now I have something to help with scouts and PTA events. I see this little beauty getting A LOT of use!
Pin It

Friday, August 30, 2013

DIY tile~ cooling the storage room

Pin It
We have a small cool storage room under my stairs but it was time to fix a couple of issues.
I store the produce I bottle from our garden in there so it needs to be cold and dark.
It was also a bit of a squeeze through the doorway.
I thought if I took the insulation off the outside walls it would cool off more and I wanted to cover the floor in something. We had used the sticky tiles in our other house and they worked great! This was definitely a project that needed to be done before canning gets going full swing.
I found some nice (but cheap inexpensive) vinyl tile at Home Depot. I didn't have room to empty the storage out completely so I enlisted my boys help and did the job in 3 sections.
 First I started under the stairs. My boys were great helpers at taking out all the empty bottles. Once the tiles were laid they went to work moving the bottles back in place. 
Now for section 2. We had to move my homemade shelves, no easy task mind you. Those babies are He-avy!
Most of the tiles went down nicely. We have to do a bit of cutting but not much. I am not good at that part so thankfully dear hubby indulged me after he got home from work.
Then we finished off with the last little bit, working my way out the door.
The insulation I took off the walls gave me 8 inches more space. I know that doesn't sound like a lot but it was perfect. Now the shelves fit better and my lunch bins easily slid in between the shelf and wall. Remember that tight fit~ yep, no more.
Ahh, that is wonderful! So much better. It's amazing how little things can make big differences.
Now my bottles are no longer right on the cement. Did you know that water bottles can leach the taste of  cement into it. Uck! This is better. I plan on putting my water on pallets as well.
I don't mind the cement walls. They are outside walls and will help to keep the room cooler.
Now for a door and light switch of it's own....
Pin It

Wednesday, August 28, 2013

Bike Helmet Rack

Pin It
 I found this large but narrow piece of peg board in Home Depot's cull lumber area. They have a cart that they discount various pieces of lumber on. It is usually only $0.60. Sometimes they have great pieces on the cart. I always check it out. I wasn't sure what I would use it for but knew this peg board would come in handy. The price was literally pocket change.
I already has a 1x2 to frame the back. It turned out to be a great project for my boys to learn to use the power tools with. Simple cuts. No big deal if you cut wrong. They did a fantastic job.
 Just frame the back to give a space between the wall and the peg board. This allows the hoods to slide into place. I think the pegs were less than $5 so for around $5 I have all the helmets within easy reach.
An just above the helmets are the fishing poles. After returning from camping I set a pole up on this tool wrack and realized it was perfect for holding all the rods. Sure enough, a perfect fit. Now the rods won't get tangled with other camping gear. 
What do you think? Are you bikers in the fall? This might work for you.

Pin It

Thursday, July 18, 2013

Canvas Awning how to....and a summertime word art.

Pin It
Now that we have a wonderful deck I made great plans to enjoy family BBQ's on it every evening throughout the summer. My boys love Love LOVE eating outside. Great idea right?! Well, the kicker was dear hubby spends all day working in the desert sun. He said he didn't mind the heat but he just couldn't handle anymore sun. By the time he gets home he just wants to relax in the cool shade. I totally understood. We still need to finish the cross beams for the pergola but that won't really shade much. Our umbrella for the table bit the dust last fall and another umbrella was out of the budget. Instead I found inspiration in the paint section of Home Depot...
(Just a funny side note...pulling into Home Depot one day my sweet 5 year old lamented, "Mom, I don't want to go in that store!!" I asked why and he proceded to tell me, "Because I don't wanna do any crafts or projects!!" Oh, my dear son knows his mom so well. Home Depot is often worse than a craft store for me. Outa the mouth of babes right)
So back to my project (hehehe).....CANVAS!! Yep, canvas. You can get large drop clothes for a fraction of the cost of canvas at the craft store.
We found a large drop cloth (12x15) that I thought would work great. 
The plan was to use pipe to hold the canvas but YIKES that was expensive. It needed to be strong enough to hole the canvas over 15 ft....PVC was to light but conduit just might work. Only 1/3 the cost too.
 
 I had to use this connector to piece 2 sections.
 They were long!
 Then we used these brackets to screw into the beams.
 Now when I want to take it down in the fall I can just undo the brackets but I don't have to take it out of the beams. Perfect!
 Now I needed a way to hold the canvas to the rods. I had pictures several different ways but actually getting one of those ways to WORK was a whole other story. Remember I was trying to keep the cost down as well as be functional and versitile. I thought these curtain clips would work but nope. They weren't strong enough to hold up against the wind.
 I tried sewing a 3 inch seam to slide the bar through. That worked great until I needed to close the brackets holding the rod in the center. The center bracket on the middle rod was impossible to get the screw in the right spot. 
Back to plan A I went...large snap gromets.
By now I REALLY wanted this little project done. I was getting frustrated that I hadn't accomplished anything on our weekend off. Just when I was close to getting it figured out the heavens opened and DUMPED on us. 
I couldn't just let it go though. OH NO!
I was out their in the rain frantically trying to finish my little big project.
 Can you see the drops? They were huge! And came on with a vengeance that only a rain shower in the desert can do.

 Undaughnted I trudged on. I needed to get the holes for the grommets marked and cut. I am so thankful for a wonderful hubby and a son who is learning that mom just needs to "get it done" sometimes. They were out there like troopers helping me as I barked orders ahem, asked calmly. (I mean come ON! It was pouring rain!)
 In the end we did get it done and I LOVE IT!
 We can open and close it as we need and now I can easily take it down at the end of the season.
 Now dear dad will gladly go out on the shaded deck and BBQ juicy steaks for his family.
 I love sitting on the deck, just enjoying the fresh summer air. I love our time at the patio table as a family. The boys love it too.
Did you notice my pillow? We found that at Home Depot. I loved it but dear hubby didn't think it would match the new cushions. When we got them home I knew I needed it! By the time I got back to Home Depot the pillow was gone. Every day thereafter I would check to see if they had gotten another back in. Finally my patience paid off. My sweet hubby just laughed but knew exactly what I was doing. He gets this little twinkle in his eye that says "I knew it!" Yep, he's got my number all right. I love what it says:
Click the picture for the download.
Pin It

Sunday, June 30, 2013

Gardening...make a difference in 15 minutes!

Pin It
 We had a great weekend outdoors with family. We played and picniced then cooled in the house for a bit. After a nice rest I became restless. Ironic, I know. I need to keep moving and keep doing. Evening was coming but it was still so hot. Thankfully there was wonderfully inviting shade around front. I had already trimmed my shrubs this year but holy cow, they are growing. I decided it would be a good time to take a few minutes to clean up.
 My flowers had busted out with great glory but now they were looking heat worn, browning and tired. I love the blossoms; enjoy them while they last then clip them back to start over with fresh blooms. Yep, it was time to get some trimming done.
I grabbed my clippers and started with the shrubs. They are full and lush. I haven't gotten my power clippers yet but still manage to do a good job. Just like farming or making garden rows I eye a spot on the house and trim even with it. I actually want the shrubs a little shorter so they go just under the window but have a hard time getting them there. Trimming front to back and left to right I trimmed those shrubs nice and neat.
Then to the rose bushes. I love them but they can easily get overgrown. I am rather generous with my rose trimming. I want the bush to stay small because it will grow long branches before reblooming.
It didn't take long but has a big impact on my curb appeal for my house. I love how clean things looked when I finished. Now I feel better. A little activity and tidying up before the close of the day...just makes my heart smile.
See, what do you think? Gardening doesn't have to take all day or be sweat inducing. Just a little shade and 15 minutes. Look what you can accomplish.
Pin It

Monday, February 25, 2013

Palet Ottoman tutorial

Pin It
A couple of months ago I snatched onto a great rectagle palet from work. I was beautiful! The wood looked great but more importantly the top was almost solid. I knew right away it would be the perfect project. I had decided it would become an ottoman.
Now my problem was finding the right fabric and getting the foam. Thankfully both were on sale this last weekend at JoAnn's. So my Presidents day was spent buidling my new ottoman. It turned out fantastic. I really like it but my boys love it- all 5 of them! ;-)
There are several tutorials on Pinterest. Here is what I did.

Step 1: I used spray insulatin foam around the edges. I didn't want to feel the wood pressing through the edges of the foam. The insulation foam said it would take 8 hrs to set but it was good to go after just a couple of hours. I was really glad. I didn't know how long my boys would resist the temptation to play on it again. It was too cold to put outside.
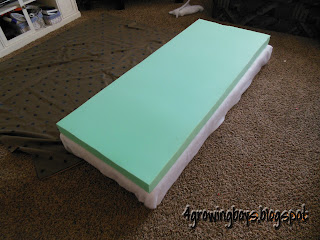
Step 2: After the insulating foam came the batting. I just used some remnant batting to put over the top and around the edges. Then I placed the camping foam on top of that. One side note: I bought a foam pad by the yard at Joann's but it is much cheaper to use a mattress foam pad. Yeah, a DUH! moment.
Step 3: turn the palet upside down on your fabric.
Step 4: Stretch the fabric tight and staple it to the bottom.
Work all the way around. For each side I started in the middle and worked my way out.
Step 5: I used some left over canvas to finish off the bottom. I love the clean underside.
See, so much better than the rough edges of wood and fabric.
Step 6: Add the plates for the feet. Home depot to the rescue.
Step 7: Screw on your feet. I haven't done anything to finish mine yet. I couldn't decide how to finish them or whether to just leave them natural....
Step 8: sit back and enjoy your new furniture! My boys love this new addition.
I think decided to paint the feet red. What do you think?
Pin It

Tuesday, February 19, 2013

Ahh a new faucet

Pin It
I have a wishlist of great things to do in my home. Most of them fall into the "want" category more than the "need" so in our endevor to be frugal and debt free they generally remain low on my shopping list...VERY LOW.
That is why I have come to love getting gift cards.
For Christmas we were given several gift cards to Home Depot. I asked my sweet hubby what he thought we should use them for. Something practical like adding to the supplies to finish the basement? Tools? Organizing supplies? Gardening gear? What?
Can you imagine my thrill when he said to get the new faucet we have been eyeing for a while!!! We have wanted it but could never justify the cost when our current (boring) faucet worked just fine. Now...well now I am wearing a smile whenever I walk into my kitchen. Who knew a faucet could make me so happy. But it is SOO pretty!!
 See, basic builders grade (ultra boring) faucet....
 Sweetest man who knows just how to make his wife happy!
Ahhh, new stylish, functional, lovely faucet.
Truth be told, sweet hubby comments all the time how much he likes the new faucet.
Thanks family and friends for the gift cards for a "want" item making us very happy!
Pin It

Thursday, January 24, 2013

Homemade washcloths

Pin It
Each Christmas our PTA has a Santa Shop for the kids to do some Christmas shopping of their own. The kids love it and get to learn about money and giving all at the same time. 
The problem this year was the stuff the company sent us was a lot of crap. Other items were spotted at the Dollar Store. *ugh* Really?!
So as frugal moms we said we can do better. So throughout the next year we are on the lookout for clearance items and fun gift ideas the kids can shop for. I am super excited! Just seeing the ideas and deals we have found already I think this will be the best Santa Shop ever!
Even my sweet hubby is watching out for toy deals. He picked up some great Lego sets for 1/4th the original price. SAWEET!~
I decided to focus my crafting efforts on the Santa Shop this year as well. I have several ideas and have others started.

Homemade washcloths are simple to make.
Put with a scrubbie and voila~ one great gift for mom or grandma.
They take about an hour each to make, maybe a bit more.
So during any down time; watching a movie with the family, waiting in car pool, waiting at the Dr office, waiting in car pool....I just pulled it out and do several rows. I have about 10 made already. I think I am gonna try to do about 30. It has been fun to try a couple of different patterns too. Such a  fun, easy, and portable craft. It feeds my addiction and fills a need at the same time. Perfect!
Check back for the next project next week. 
If you have any ideas I would love to hear. Just LMK! ;-)

ETA: This pattern came from a little book I picked up at Joann's but here are a couple of freebies some lovely ladies have shared. I am in love with the Waffle Crochet Spa Washcloth. It is simple and fast. Just my style!
 Waffle Crochet Spa Washcloth
Dishcloth
Pin It

Monday, October 22, 2012

Deck building 101

Pin It
We are creeping along on the last stages of the deck. We managed to put up a couple of the cross beams only AFTER which did I realize it would have been easier to paint them BEFORE going up...ahh, the learning curve. So with the next ones I made sure to at least get a coat on them so we only have to do a bit of touch up.....
While I work, the boys enjoy the dirt..... You know, the noise with dirt on it....
See the trees? Yep, right there....and there....we got those a while back but waited to put them in until we finished (or almost finished) the deck. It was a good thing because I ended up putting them somewhere different. They are Autumn Blaze Maples. They grow fast and provide great shade in the summer and brilliant color in the fall. Just thinking about the shade makes me smile.
Give us a couple of years and the back side of the house won't be quite so hot anymore. Lovely shade over the lovely deck.
And now we are still waiting for the composit.......
Pin It

LinkWithin

Related Posts with Thumbnails