Showing posts with label thrifty ideas. Show all posts

Monday, February 25, 2013

Palet Ottoman tutorial

Pin It
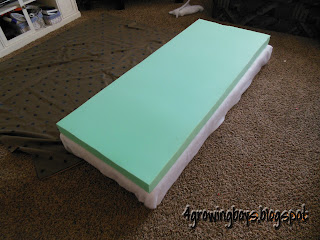
A couple of months ago I snatched onto a great rectagle palet from work. I was beautiful! The wood looked great but more importantly the top was almost solid. I knew right away it would be the perfect project. I had decided it would become an ottoman.
Now my problem was finding the right fabric and getting the foam. Thankfully both were on sale this last weekend at JoAnn's. So my Presidents day was spent buidling my new ottoman. It turned out fantastic. I really like it but my boys love it- all 5 of them! ;-)
There are several tutorials on Pinterest. Here is what I did.

Step 1: I used spray insulatin foam around the edges. I didn't want to feel the wood pressing through the edges of the foam. The insulation foam said it would take 8 hrs to set but it was good to go after just a couple of hours. I was really glad. I didn't know how long my boys would resist the temptation to play on it again. It was too cold to put outside.
Step 2: After the insulating foam came the batting. I just used some remnant batting to put over the top and around the edges. Then I placed the camping foam on top of that. One side note: I bought a foam pad by the yard at Joann's but it is much cheaper to use a mattress foam pad. Yeah, a DUH! moment.
Step 3: turn the palet upside down on your fabric.
Step 4: Stretch the fabric tight and staple it to the bottom.
Work all the way around. For each side I started in the middle and worked my way out.
Step 5: I used some left over canvas to finish off the bottom. I love the clean underside.
See, so much better than the rough edges of wood and fabric.
Step 6: Add the plates for the feet. Home depot to the rescue.
Step 7: Screw on your feet. I haven't done anything to finish mine yet. I couldn't decide how to finish them or whether to just leave them natural....
Step 8: sit back and enjoy your new furniture! My boys love this new addition.
I think decided to paint the feet red. What do you think?
Pin It

Monday, February 11, 2013

Homemade refried beans

Pin It
I had heard about making refried beans in your crockpot but I had never tried it. Sometimes you just have to say, hmm I am gonna do this and then DO IT RIGHT THEN!

Take 1 small crockpot
1 bag of beans (yep, just the bag of dried beans)
(I tried pinto and black, both were great)
Throw in some garlic salt and sliced onion
Add some chicken boullion or a can of chicken broth
Top it off with water (you may have to add more as the beans soak it up)
Let cook for about 4-5 hrs on high. Just until the beans are easily mashed.

Drain off the juices but save it. Pour the beans in your mixer and mash away. Add juice to get the right consistency.
 
Such a simple and cheap recipe. Made better by being a long term food storage item. No more need to resort to cheap PB&J when you haven't made it to the store!
My boys loved it! It was a perfect after school snack. Just spread on a tortilla and sprinkle with cheese.
It stayed good for a week in my mason jar.


Pin It

Thursday, January 10, 2013

Make your own lanyards...

Pin It
While at Disneyland we decided to try the Pin Trading. You get to trade pins with all the cast members. There are soooo many you will never get bored. And if you don't get what you want there are oodles to choose from to purchase. We needed lanyards to put all our pins on and I didn't really want to buy them. So, like the self respecting, frugal crafter that I am I decided I could make some.
Lanyards really are easy to make. Just 15 minutes and you've got it. I don't use exact measurements when I craft but that is ok with these.
Gather your supplies:
Sewing machine
Ribbon
Key ring or other attachment piece
Scissors and thread Yeah, you get the point ;-)
I found this ribbon at Walmart of course and got 2 long lanyards from it. I had enough left that if I had made them a bit shorter I could have gotten 3. Just placed the ribbon around your neck to determine it's length. Remember to adjust for any little ones you will be making them for.
 Grab your key ring or whatever attachment do-dad you are using and thread the ribbon through it then sew a strong seam. This will be pulled on a bit so make sure to sew it well.
Use some pinking scissors to keep the end from fraying. If you are lucky enough to have a serger YEAH! Just serge the end before you fold it over the ring.
 
 Perfect! Just a couple of minutes and now you are ready to add your favorite pins.
This is Mr. Matthews. Can you tell who his favorite characters are?
Pin It

Wednesday, November 14, 2012

Melted Snowman Ornaments- 15 minute project

Pin It
I don't usually have a lot of time to craft and create so I love it when I come across a project that came be finished in those 30 minute windows between mom's taxi runs. 
This little ornament is quick and easy.
Gather your supplies (chances are most of them are already sitting out).
Glue gun with extra glue.
Jute/string/thread anytime will do.
Pony beads for eyes and mouth. (you could use anything really)
Orange pipe cleaner (I tried a orange sparkle bead, worked too)
And aluminum foil. I tried parchment paper first- didn't work.
Step #1:
Tie a little knot at the end of your string. Then start glueing. Put a bit of glue around in a melted pile. I tried just one big spot as well as going around the edges. Both worked but I like how it spread out better going around the edges. You just want to make sure it over laps so the glue runs together.
Add "2 eyes made out of coal" uhemmm, I mean two eyes of beads.
"And a button nose" made of orange pipe cleaner.
No corncob pipes here but a nice beaded mouth. Oh and here is an idea of how big the nose is. About 1/2" then fold it in half. Too long and it doesn't sit in the glue very well.
Then tuck them in the freezer. Yep, right their. Oh, move the ice cream out of the way. Between the yeast and baking soda box will do nicely. That way they will set up and pull off the foil more easily.
After about an hour use have this!
Cute melted snowman ornaments.
Just beware, little elves might move them around to help decorate their own little rooms. ;-)

Pin It

Friday, November 2, 2012

A little Visit Teaching treat.

Pin It
 Another great Pinterest idea. 
I threw these together for my visit teaching ladies Conference weekend.
Just POPPING (popcorn) by to wish you a meaningful
conference weekend. Sit back, relax and SOAK (lotion) it
all in. Hope you learn something EXTRA (gum) and take
NOTE (notepad) when you feel the spirit. Enjoy!
Funny, I never got one put together for myself....lol!
Pin It

Wednesday, September 21, 2011

Fun Coat hooks...

Pin It
I found some small railroad nails in a box of junk at the DI. I was thrilled but my dear friend thought I had a few loose nuts. She just stood back and smiled while I dug through "junk".
I hoped to find a 4th and use them in my bathroom as towel hooks but could not find another. I checked a couple of army surplus stores and still came up short, so on to plan B.
I picked up some square blocks and stars from Michaels.
Painted them, sanded the edges, and added the stars. I used black paint to dry brush the sides for an aged look.
I couldn't decide where to put them so I put them up with Command hook stickies. They are strong enough to hold the coats and backpacks but they are great for giving me an idea if a spot will work before I pound holes in my walls.
I think this spot works well, just behind the front door....
What do you think?


IhookedupwithHoHlamespice
Pin It

Saturday, July 30, 2011

Bar soap to liquid soap...

Pin It
I am going to have to try this. Plus my sis-in-law would love this as well. After cleaning up numerous soap shavings from cub scouts learning to carve I have tried in vain to not let those shavings go to waste. I confess they become more of a hassle than they are worth. Now I will be able to turn that pile of ivory soap shavings into a usable form.
Pin It

Friday, July 1, 2011

Jewelry stand....

Pin It
Last year I made some cupcake stands. I also made some out of glass plate (I can't believe I didn't blog it, or if I did I can't find them now) but it got me thinkin'. A dangerous pasttime I know. You see I have been needing something for my jewelry. I have seen lots of cute ideas but never got around to doing any of them. I also don't have much space to hang anything in my bathroom.
After a bit of thinkin', being careful not to hurt myself, I came up with this...
I figured I could put the cupcake stand idea to work here too. I must say I am pleased with the end result.
I found these dishes at the DI- goodwill and simply glued them together.
Now I have a small bowl to hold my earings and plates to hold my necklaces.
I love that I found matching plates and a bowl. I didn't paint them or anything.

I noticed the fumes from the superglue discolored the cups they are stacked on. I was hoping to keep the clear color but it didn't work out. Otherwise I would have painted the cups white to match the rest.
Still, I am thrilled. 

Pin It

LinkWithin

Related Posts with Thumbnails