Showing posts with label frugal tips. Show all posts

Friday, June 14, 2013

Top 10 Go To Recipes....

Pin It
So I noticed a fellow blogger commenting about having no clue what to fix for dinner and asking for suggestions. It got me thinking what my "go to" recipes were. You know the ones....where you don't have to pull the recipe out....where you can make it without much thought and even less time....
YEAH!
Those dinners!
You know we all have them. 
The moments you go Awe Crap!
 Is it time to fix dinner already?!?
....Unless your clan is like mine and never stop eating. My kitchen seems to be an endless cycle of snack and meals. Kinda expected with 4 boys. Add in the friends (boys) that are always hanging around (and welcomed) and yeah, the kitchen never seems to close....
Anyway, here is my go to list. I hope it helps get you outa that awe crap rut....
In no particular order:
  1. Spaghetti- the boys all love it and score, it's cheap too. Easy to fix from the pantry.
  2. Fruity chicken salad- salad, grilled chicken, mandarin oranges, grapes, Parmesan cheese tossed together, topped with poppy seed dressing and you are ready to go. Yep, even the boys enjoy it.
  3. Hamburger Casserole- browned hamburger, shell pasta, green beans, corn, carrots, olives, cream of mushroom soup. Mixed together and enjoy. Great cooking from the pantry.
  4. Pinwheels- browned hamburger rolled up and baked in biscuit dough like cinnamon rolls, topped with tomatoe soup or gravy. One of my favorite meals.
  5. BBQ- anything thrown on the grill= easy, yummy summer meals
  6. Taco Salad
  7. Chicken Salad wraps
  8. Roast- or anything tossed in the crockpot
  9. Steak or chicken Fajitas- A1, Worcestershire sauce, onion, peppers, cheese, tomatoes, shells= YUMMY
  10. Breakfast for dinner- my boys LOVE pancakes. It's a pantry staple and quick to fix. Add eggs or bacon and my troop is happy.
We buy beef and pork from a rancher friend (the only way to buy you meat!) and keep it in a big chest freezer. Just add vegis and we are good to go. 

So there you are. I have a few others but these will cycle round the month to fill the last minute holes or maybe just fill the hole until I go shopping again. I love to keep recipes on hand that come straight from the pantry. Helps my preparedness skills too.
Pin It

Monday, February 11, 2013

Homemade refried beans

Pin It
I had heard about making refried beans in your crockpot but I had never tried it. Sometimes you just have to say, hmm I am gonna do this and then DO IT RIGHT THEN!

Take 1 small crockpot
1 bag of beans (yep, just the bag of dried beans)
(I tried pinto and black, both were great)
Throw in some garlic salt and sliced onion
Add some chicken boullion or a can of chicken broth
Top it off with water (you may have to add more as the beans soak it up)
Let cook for about 4-5 hrs on high. Just until the beans are easily mashed.

Drain off the juices but save it. Pour the beans in your mixer and mash away. Add juice to get the right consistency.
 
Such a simple and cheap recipe. Made better by being a long term food storage item. No more need to resort to cheap PB&J when you haven't made it to the store!
My boys loved it! It was a perfect after school snack. Just spread on a tortilla and sprinkle with cheese.
It stayed good for a week in my mason jar.


Pin It

Thursday, January 10, 2013

Make your own lanyards...

Pin It
While at Disneyland we decided to try the Pin Trading. You get to trade pins with all the cast members. There are soooo many you will never get bored. And if you don't get what you want there are oodles to choose from to purchase. We needed lanyards to put all our pins on and I didn't really want to buy them. So, like the self respecting, frugal crafter that I am I decided I could make some.
Lanyards really are easy to make. Just 15 minutes and you've got it. I don't use exact measurements when I craft but that is ok with these.
Gather your supplies:
Sewing machine
Ribbon
Key ring or other attachment piece
Scissors and thread Yeah, you get the point ;-)
I found this ribbon at Walmart of course and got 2 long lanyards from it. I had enough left that if I had made them a bit shorter I could have gotten 3. Just placed the ribbon around your neck to determine it's length. Remember to adjust for any little ones you will be making them for.
 Grab your key ring or whatever attachment do-dad you are using and thread the ribbon through it then sew a strong seam. This will be pulled on a bit so make sure to sew it well.
Use some pinking scissors to keep the end from fraying. If you are lucky enough to have a serger YEAH! Just serge the end before you fold it over the ring.
 
 Perfect! Just a couple of minutes and now you are ready to add your favorite pins.
This is Mr. Matthews. Can you tell who his favorite characters are?
Pin It

Tuesday, December 4, 2012

Chemical free cleaning success

Pin It
 I have seen this recipe all over pinterest. After working so very much lately my housework has fallen behind, especially my showers. So what better time to give it a try. 
Equal parts white vinegar and blue Dawn. 
Don't know why the specify blue Dawn but it needs to be the original. 
Warm the vinegar and mix it in with the dawn.
 A while back I picked up a large brush just for my showers. It is so much nicer for the larger areas.
 Just spray it on. You can wait a bit but I just set in running the scrubber over the tile. I am not feeling well today so trust me, I wasn't exactly "scrubbing". Can you see the difference?!
 
Ok, here is a better picture. No more yucky soap scum. I love my tile color cuz it hides the scum pretty well but my nose can tell. (I am allergic to soap scum, go figure)
This kind of improvement without much effort at all, perhaps just 5 minutes, and definitely no elbow grease. Yeah, I am a believer now. I think I will spray it on after I shower in the morning then let it sit for a bit before scrubbing.
Give it a try, let me know whatcha think.
Pin It

Wednesday, November 7, 2012

Mason Jars+Cupcake wrappers=Organized!

Pin It
 What a mess. I hate getting into the cupboard for 1 thing and having 10 come out. I have been wanting to do something about this for a while. Yesterday, I broke down and took 5 minutes to do just that.... 
Take 1 pile of cupcake wrappers
 1 wide mouth mason jar....
 Place wrappers inside. Nice, neat, and tidy...
Put the lid on it nice and snug and VOILA! No more jumbled mess.
Ahhh, I feel better already!
Pin It

Sunday, September 9, 2012

School lunch vs Home lunch

Pin It
It's the old question every mother figures out each school year right?
Do I pay for school lunch or make sack lunches.
Now if you have a nasty school lunch it will be a no-brainer but what if your school lunch is one of the good ones. You know that still makes the rolls from scratch on site.
That makes your mouth water smelling the chocolate chip cookies baking around 10:00!
Well, we are lucky enough to have one of those school lunches. I occassionally will go have lunch with my boys and have always been pleased with what they had. It reminded me of my own yummy school lunch. Yes, mine was yummy and almost everyone ate it! We had the best head cook!!!
Anyway, back to today....
A few years ago I figured the cost of sending my boys with sack lunches. Now you have to realize that my boys don't just eat a PB&J and a bag of chips.
Nope!
They need meat and cheese sandwiches.
And fruit.
And a vegi stick.
And a treat.
And any other goodie they can talk mom into.
Bottom line...my boys eat more than the average school child.
With my frugal skills to the test I figured I could, coupons in hand, supply a nice, healthy and filling sack lunch for under $1.50. That became my guide. Anymore than that and it was a no go. In Idaho, we had sack lunches everyday.
But here we had a yummy hot meal each day that was only $1.60.
I made the decision to go with it.
Now the price went up $1.65 but more importantly my oldest is in Jr High. Apparently (I haven't eated there yet) they have much more to be desired than the elementary. It is also more money, $1.95. That meant fixing a lunch for dear hubby and 1 of 4 boys.
After making a trip to Costco, sans coupons this time, I sat down to re-figure my cost of lunches. Here is what I found out.
Generally I can fix a nice lunch for under $1. Not too bad!
I don't send juices, just a nice water bottle. Here is the breakdown for you....
Yogurts:          $0.46
Lunch meat:    $0.12
Cheese:           $0.18
Peanut Butter: $0.07
Bread              $0.17
Banana            $0.18
Pudding          $0.22
Mini Carrots   $0.24
1/2 peach        $0.34
Fruit cups       $0.42
Rice crispies   $0.20
Cummy Bears  $0.16
Goldfish          $0.15

I can my own jam from our berries so I didn't figure the cost of jam. This just gave me an estimate of how much lunches are costing us.
Each item that came bulk I packaged into snack size bag and placed in either a "side dish" bin or a "dessert" bin. The boys pick one from each, then add a couple of things from the fridge and they are good to go. It's great for the mornings mom has been up all night working and doesn't have the strength for anything.
Pin It

Wednesday, August 10, 2011

Bento style lunches

Pin It
My dear hubby works 10 hour shifts out on the Utah desert. He doesn't get an official lunch break but rather eats on the run. He doesn't like anything salty to make him retain water. He needs only finger foods and prefers high moisture content foods, like grapes and watermelon.
I asked him for requests and he said, fruit and vegis are nice...(yep, we always have those thanks to Bountiful Baskets)...string cheese (uhmm, yeah, I buy this ALL THE TIME! But 4 boys tend to devour string cheese)...and sandwich alternatives.
He gets really tired of sandwiches, understandably, but I'm not sure what else can be eaten on the run.
I managed to get my brain engaged on the topic at 2am (I was working that night) and came up with an idea.
I thought on the Bento box idea from Japan. If I could get a divided container and fill it with finger foods, he could just grab it and go.....
hmmm, on to something there. So I stopped by the store on the way home. They had divided ziplock containers. I picked up 6. 
Then I presented my idea to dear hubby. 
He LOVED it. He wouldn't have to fix his lunch at 0530 am! 
We made a list of what we had in the fridge to fill his lunch and shopped for what was missing.
I filled the main compartment with an entree, added a fruit and a vegi to the smaller slots. I left any condiments off, hubby has a stash at work that he can just add when he is ready to eat. This meant I could make the meals ahead of time without fear of them going soggy. 
I made a list of 'extras' he can add for a treat or something more. 
I just put it in the cupboard next to the menu so he can just look at the list and grab what he wants.
Hopefully, this will make his mornings easier and give a bit of variety to his meals.
Here are the ideas I had:
Entree: BLT wrap, meat and cheese slices, deli style sandwiches, PB&J sandwich (his request), chicken strips....

Vegis: carrot sticks, celery and PB, tomatoes, cucumber slices,

Fruit: grapes, strawberries, plum, peaches, applesauce

Extras placed in snack size bags ready to grab: frozen candy bar, raw almonds, string cheese,  yogurt covered raisins, frozen gogurts, cookies.

Hubby was excited to have all this ready made. 
I am wondering about something similar for school lunches???

Sharing here:
<center><a href=” http://www.aroundmyfamilytable.com/” _mce_href=” http://www.aroundmyfamilytable.com/” target=”_blank” title=”Around My Family Table”><img alt=”Around My Family Table” src=” http://i3.photobucket.com/albums/y100/waoneal/ttttnew2.jpg” _mce_src=” http://i3.photobucket.com/albums/y100/waoneal/ttttnew2.jpg”/></a></center>
<center><a href="http://www.simplysweethome.com" target=blank><img border="0" alt="Photobucket" src="http://i372.photobucket.com/albums/oo163/JHRivers/SimplySweetHomeButton-1-2-1-1-1.png" /></a></center>
Pin It

Tuesday, August 9, 2011

Hot mom HOT!!

Pin It
Our back yard faces west which makes it extremely hot in the afternoon. We have planted some trees and plan to build a covered deck next summer but until the trees grow and the deck is built it is hot Hot HOT!

We put a screen door on the back door earlier this summer, which I love. I don't have to worry so much about yelling, "Shut the door".

Even with all this we still have a problem. The back door gets too hot for the kids to close leaving the sun to poor in during the afternoon hours. Mr. M was telling me "hot mom! HOT!"
I didn't want them to get burned so this is what I came up with.....
I used cow magnets to hook the towel over the hot door. Cow magnets are really strong. Farmers use them to prevent sharp objects from going through a cows digestive track and tearing things up. You can get them from Cal Ranch or any other farming and ranching store. I love that they hold lots of papers or thick fluffy towels.
The towel gets warm but now I don't have to worry about little shoulders and arms touching the door and getting burned. It is just a temporary fix for the rest of the summer that didn't cost me a thing!
Pin It

Tuesday, July 19, 2011

Thrifty gift bags....

Pin It
Love these gift bags. Do them up with comics and they are perfect for boys! 
Pin It

Thursday, July 7, 2011

Energy Saving tips this summer

Pin It
With the increased use of our AC I have been searching for was to keep our energy use down and thus our cost. After being in our new home a year we are finally able to compare usage data. Also Rocky Mountain Power uses a tiered billing system through the summer months. You pay more based on increased usage....
Billing Months - May through September inclusive
7.5292¢ per kWh first 400 kWh
9.2749¢ per kWh next 600 kWh
11.5361¢ per kWh all additional kWh
Thankfully we have had a cooler and wetter spring so we haven't needed to run our AC much until the end of June. Now we are in the mists of summer heat. Last month we used just over 800kWh. As summer really heats up I am hoping to keep it as close to this as possible. I definitely don't want to go over the first 1000 kWh. To save on our electric bill here are some of the tips I have tried....
  • Unplug electronics not in use.... I have looked around the house and unplugged everything from lamps, to clocks, to radios to my toaster and mixer. Even when they are turned off they are leaking energy. It's not a big deal to plug them in when I go to use them.
  • Keeping the AC set at 78..... the comfortble tempature range for the human body is generally 70-78. I turned ours to the higher end.
  • Add increased air flow with fans.... we installed a ceiling fan. It is an energy effecient fan. By increasing the air flow the higher temp doesn't seem as high.
  • Turn off lights.... this might go without saying but with little ones I am forever going behind them to turn off lights. This is more of a problem at night when Mr. M cries, "Ma, Da, Dar...!!" We have to leave the closet light on but I try to sneak in after he has gone to sleep and turn it off.
  • Opening windows on cool nights....In Idaho, the temperature always drops to 50-60 on summer nights. It was just enough to cool the house again. In Utah, the nights are just as warm. I try to watch the news and when it's cooler outside open the windows and let the cool night air in.
  • Wash with cool water....I adjust my washer to wash with cool water. It also helps my clothes to last longer.
  • Give the dryer a break, line dry....My mom had the same dryer for 30+ years by doing this. She never used it in the summer. I however, am having a hard time giving up my soft fluffy towels. I also don't have a good spot to protect them from dirt, but I am working on this. Even a load or two will save the power bill.
  • Power down....I have made a habit of shutting the computer OFF at night, including the screen. We used to just let it go to sleep mode but now we power it down completely.
  • Keep curtains and blinds closed....with west facing windows the afternoon sun just beats in. I have kept my blinds closed but on really hot days I also close my curtains. It makes a difference.
  • Be a tree hugger....we have planted several trees but are looking to plant a few more close to the house. I won't get the benefit from them for about 5 years but it is an investment worth making. If I plan just right I will get double benefit with my deck and house in shade during the hot hours of the day.
There are lots of other tips but these are the ones I am shooting for this summer. What are you doing to save this summer? What else can I try? Please let me know. I love to hear from you.
Pin It

Sunday, January 30, 2011

Old pants made new

Pin It
Every mom I know has dealt with this little problem....
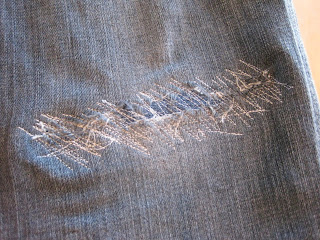
Yep, those pesky levis wear through the knees before they shorten in length. Of course this has absolutely NOTHING to do with the boy wearing them. Honest mom! I don't know how they tore. Neither do they know how a small hole has suddenly become this big, gaping CRATER!
Now, I must tell you my 4 boys all take after their lovely daddy. They are tall and skinny skinny. To say slim jeans are hard to find would be a gross understatement! So usually my oldest especially ends up with buckles in the fabric from cinching them tight enough to stay up where they belong.
(we have a 1 inch rule: no more that 1 inch of your underware showing!)
It's either that or wear hi-waders.
You also know how hard it is to keep kids in pants. When my oldest tried to wear these pants to school I promptly sent him to change and sat down later that day to try a trick I'd read about a while back.
Horray! I got it to work! Now those holey jeans look fresh off the rack. One of the benefits of "Worn" being the in style.
I didn't take pictures along the way but I will try to explain what to do....
First I had to clean up the hole. I trimmed all the strings.
Thenk, I took a piece of levi from another worn pair of jeans and inserted it on the inside of the pantleg. This became the 'patch'. Then I sewed a stitch back and forth on an angle. I like how the angle looks although that was not intentional. I couldn't get the pantleg turned the direction I wanted so I just went with it. I went back and forth over the entire hole several times. With the patch on the backside you get the (very in style) worn look.
My dear son was very pleased to have his pants fixed. Thankfully my boys don't care what they wear as long as it passes mom's inspection. I'm confident though that this would pass even the style police's inspection. I think they look great!
Now if only I could get the other boys skinny pantleg to fit over my sewing machine.
Yep, I think we will make it through the rest of the school year with these jeans!
Keeping It Simple


Making
Pin It

Tuesday, January 11, 2011

Pallet shelf/coathook....

Pin It
I have had a pallet sitting in my garage waiting for this project. My plan this month is to finish projects I have planned or purchased supplies for.
I loved the natural wood color but I needed some color against my cream walls so I opted for blue for Keegan's room.
 I added hooks so he would have somewhere to hang his coat and backpack.
 You know "A place for everything and everything in it's place"

 I love how it turned out but.....
we ran into a problem. I tested the door and it was ok. I just didn't plan for the hooks. See that last hook, yeah, the one right against the 'mostly' open door.  UGH!! I am afraid someone is gonna run into the door and POP!! the hook is gonna go right through. So down it comes. I will have to make something different for him. Perhaps like Tyler's.
I also made this for my bathroom.
 Yeah, dear hubby has to read while on the throne. Why is it that guys have to read while in the bathroom? I think it is just so they can hide. Of course it would never work for mom. The boys find me no matter where I am! Ladies, you know what I'm talkin' about don't you!
Blue for boys, red for mom.
I am pleased with it but I need your help. I want to put some vinyl on the front of it but not sure what. Any suggestions?
We also made one for my friend. 3 shelves from 1 pallet. Not too bad.
Linking up:
Pin It

Monday, April 5, 2010

Project 20 & 21 of 52: Scripture bags & Easter wreath

Pin It
I Made it Monday
I made these for the boys for Easter. The boys each got a new set of scriptures for Easter too. I wasn't sure if Josh would want one mom made plus I ran out of time so I gave him the option of a traditional scripture bag, "like dad's" or one of these. He wants one of these so I am going to be making one more. They were fairly simple to put together and the best part is I already had all of the supplies. They are big enough to hold their doodle tablets as well.
I am excited about how they turned out. The front has pockets for pens and a small notebook. I used the coin pocket from the jeans too. I found the tutorial on The Polka Dot Chair. I think the boys liked them as well. Last night they raced to get their "new scriptures" for reading even though the "old" ones were right by the couch. The goal is that they will learn to mark and search their scriptures then when the get they turn 12 they will get a nice leather set. Whatever will get them reading their scriptures is good for me.

I also made this wreath. Robin commented that he likes wreaths because you can have them for any holiday. I didn't have as much Easter decor as I thought but this was all I got added this year. I have been too busy with other projects and Easter came much faster this year.
I bought the eggs and butterflies from the Dollar Tree. The rest I already had on hand. I even have 6 more eggs that I could make another one. Spanish moss is a MESS! to deal with though. I used spray craft glue. I don't know how else you could get all the bits to stick down. The eggs and butterflies I used my hot glue gun. That is definitely one tool I could not live without. I use my glue gun for everything.
I am nearly done with my hamper redo so be watching for that. Anyone else have great ideas to share? Let me know.

I'm linking to:

Pin It

Sunday, November 8, 2009

Organize those sacks

Pin It
My sis-in-law and I have been talking about frugality lately. We are both trying to pinch our pennies in more was than one. Some out of necessity, some out of practicality. She is an inspiration to me in how she can decorate and cook, etc on pennies. I love her decor and she pays so little for it. I usually have great ideas but the cost too much for me to accomplish. Anyway, I have been looking for useful and stylish ways to reuse stuff. I love to organize and just don't do well with chaos. My drawer of bags- you know the Ziplocs, trash, bread, etc is out of control! I love my reusable grocery bags so I don't have many of them but they tend to get crazy too. Well, with this in mind I came across a great idea. You know those clorox wipes containers?- this is what I did!Take the label off the container and glue your own on. I used 6x12 on both my containers. The red one is a little short but the labels don't go all the way around themselves. I love how the blue and green one looks.
Now, I plan to fill them with sacks. Grocery sacks will fill the one under the bathroom sink for a quick refill of the garbage. Bread sacks will no longer roam free in the sack drawer. VOILA! Instant organization. What do you think? I can't take credit... like most ideas I'm not the original source but I definantly know how to reproduce a great idea.

My other project of this weekend is scrapbooking. I scanned some of the LDS papers into my computer to work with. I haven't found a lot of LDS themed digi scrap supplies so I took matters into my own hands. Our friends little boy was baptised last month and they forgot their camera. We took lots of pictures for them and I planned to scrapbook them into a mini book. Plus, this spring I will be ready when Keegan turns 8. I can't believe it's coming up already!
I got my outside Halloween decor down but not the inside. I will hit that later this week. I plan on getting the outside lights up this week-maybe tomorrow- too. I love this time of year! We hit the Toys R Us sale this weekend. I think our shopping is just about done. I just have several more projects to make. I need to get sewing and MORE crafting, oh, the horror ;-).......
Pin It

LinkWithin

Related Posts with Thumbnails