Thursday, December 27, 2012

Our love of Legos....

Pin It
 We love Lego's!
We do. 
The boys (dad included) will spend hours building, creating and imagining. We always give Lego sets for birthdays and Christmas. Ok, sometimes even just because. The Lego creators continue to come up with some of the most amazing sets. The boys always put them together...then over time they get taken apart. We keep all the instructions on a hook ready to be used again but lately the boys have been flexing their own creative minds to build sets of their own.
 I love to see their latest creations. 
Mr. Josh, who aspires to be a chief, built his Lego kitchen.
 Don't get in the way of chief preparing his feast.
Santa even made a stop for Mr Tyler.
Lego's are great for boys (and girls). 
They stimulate the mind. 
They help develop math skills. 
They build creativity. 
They encourage problem solving.
Most importantly...
THEY ARE JUST PLAIN FUN!
Mom's beware. 
If you want a few moments of peace and quiet let your kiddos get lost in the Lego world. They last forever and endure all the abuse little boys can give. They do however, provide a bit of torture of their own. If you have even stepped on a Lego, you know just what I mean. And may I suggest wearing an apron with pockets while vacuuming.
Keep an eye out for sales. They don't go on sale a lot so stock up when they do.
 Stash them away for future gifts.
You will score big time mom points!
(just sharing our love of Lego's, no incentive required)
Pin It

Thursday, December 20, 2012

Wrapping 101 tutorial...

Pin It
 Growing up I always helped to wrap gifts.
Gifts for the family.
Gifts for friends.
Even gifts my friends planned to give.
I thought it was easy and I enjoyed doing it.
I loved all the wrapping and the bows and ribbons. 
I loved seeing them all stacked up pretty, waiting to be tucked under the tree.
 I still wrap lots of gifts. Just not as many for others to give.
My sweet hubby does a good job but he doesn't enjoy it like I do. He usually helps by going back and forth to the tree, filling out the tags or just keeping me company. I love the time that it gives us as a couple to talk and be together. The boys don't dare interupt or they may loose a gift or two. ;-p
Anyway, I thought I would share a step by step on how to wrap a gift. Boxes are easy but when you don't have a box it can get tricky. So gather your supplies:
wrapping paper
gift
tape
scissors 
bows
ribbon
name tags
Lets get started!

Here we have a lovely apron and cookbook. Shhh, can't tell which family member this is for.
 The first step is to measure the paper. The ends should overlap just a bit. Then cut the roll.
 
 I like to secure the paper to the gift. Then I can pull it taut without it moving. Side one, folded over...now fold the other side over....
 Hey, we are getting there. Now for the ends. This is where it can get a bit tricky without the box. I smooth down the edges then fold the corner down to meet the end of the gift. See......
 Now repeat...Do that to both sides. Then all you have to do is fold the flap over the end.
 When you are done with both ends you get to add your favorite ribbon.
 One of the easiest ways is to wrap the ribbon around the corners. Hold one corner with your thumb while you wrap. Go under by your thumb and come up at the opposite corner.
 Secure your ribbon. Add a bow.
Don't forget the tag!
See, you did it! A simple, lovely wrapping job. 
Now get the rest of them wrapped. Santa Claus is coming!
                                                                  Merry Christmas!!!
Pin It

Wednesday, December 19, 2012

Small things tied up with string...

Pin It
We have several smaller gifts to give this year. 
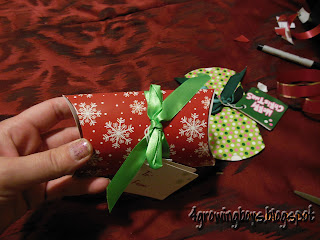
I found these fantastic little boxes at the $1 store. 
They are great for small gifts or even gift cards. 
I tucked a neck cooler inside for family. 
Then just fold the ends in and your done!
If you want to add a personal touch you can change the ribbon it comes with for something of your own.
Fast, simple cute.
Pin It

Thursday, December 13, 2012

Window lights secret revealed....

Pin It
I love Christmas! I do! I love everything about this time of year, the hustle, the bustle, the jingle bells, presents, and the LIGHTS!

My sweet hubby has learned by now that one thing that is sure to score him some brownie points is helping put up the lights. He does the outside while I do this inside.

I remember as a little girl laying at the foot of my top bunk bed and falling asleep to the flashing of the lights outside. We always put lights inside our windows too. It took at least a roll of tape per window to get those lights to stick to the frost covered windows.

Thankfully we don't have to use quite so much tape anymore. Just a few strategically placed clips and voila...you have great window lights.
My secret?
Command hooks. Yep, I love 'em!
I found these small clear clips this year. You hardly even see them.
They hook to the wire which helps if you have to adjust a bit. I used 8 on each window pane.
Just stick them to to window then clip the wire in. They are really strong. Then come off easily after the holidays. I used them last year too but I love the smaller size of these. Definently worth the couple bucks.
Plus you just get new sticky tabs and reuse the hooks next year.....hmmm I should buy stock in command hooks. I use them all the time.
(I received no compensation for this, just my $0.02 worth ;-)
Pin It

Wednesday, December 12, 2012

Onsie Cupcakes Gift Idea

Pin It
 My sweet friend is finally having another little one. She has been wanting another baby for several years but it finally happened. They are adding a little boy to their home. With a house of boys I know just what she has in store. Hold on lady, it's gonna be a ride....a FUN one!

I usually give a basket of goodies for a new mom but with the holidays and my work schedule lately I just didn't get it together so I went to Pinterest to find some new inspiration.

A box of cupcakes....how sweet!

These of course would not be your ordinary cupcakes however. Instead of edible they are wearable.
Club Chica Circle has a great tutorial on just how to do it.
In all my excitement (and trying to hurry) I forgot to take pictures of the rolling process, oops. I used 3 onsies and 3 pants. I just rolled the pants together to make the last cupcake. It's a bit bigger than the others but the effect is still there.

She loved it!

Welcome home little man! You are already loved more than you know.
Congrats Millie! You are in for awesome times....get your lego's ready mom!
Pin It

Tuesday, December 4, 2012

Chemical free cleaning success

Pin It
 I have seen this recipe all over pinterest. After working so very much lately my housework has fallen behind, especially my showers. So what better time to give it a try. 
Equal parts white vinegar and blue Dawn. 
Don't know why the specify blue Dawn but it needs to be the original. 
Warm the vinegar and mix it in with the dawn.
 A while back I picked up a large brush just for my showers. It is so much nicer for the larger areas.
 Just spray it on. You can wait a bit but I just set in running the scrubber over the tile. I am not feeling well today so trust me, I wasn't exactly "scrubbing". Can you see the difference?!
 
Ok, here is a better picture. No more yucky soap scum. I love my tile color cuz it hides the scum pretty well but my nose can tell. (I am allergic to soap scum, go figure)
This kind of improvement without much effort at all, perhaps just 5 minutes, and definitely no elbow grease. Yeah, I am a believer now. I think I will spray it on after I shower in the morning then let it sit for a bit before scrubbing.
Give it a try, let me know whatcha think.
Pin It

Wednesday, November 28, 2012

No more photo space.......

Pin It
I just ran into a problem I hadn't expected (guess I should have), I have no more photo space left. Apparently uploading photos to my blog saves them with a Picasa account but you only get 1GB free. Now I have to change something to continue to upload pictures. *sigh*

I don't make any money from my blog, I just enjoy doing it. There is just something about seeing all you guys that are interested in seeing what I have to say or the latest project I have running. 

Anyway, does anyone have tips or suggestions? What is the best direction to take from here?
HELP???
Pin It

Tuesday, November 27, 2012

Wire Trees

Pin It
A Pinterest Fail!
We had good intentions.
The pin looked so EASY.
No Problem we thought.
We picked up all the supplies we needed....
BTW: Copper wire is a bit pricey....
And got started making our own set of wire wreaths.
Just wrap them around the styrofoam cone.
Ok, uhm wait, like this? Oops, let's try that again...ugh, this is harder than it looks.
The wire is kinda digging into the styrofoam....
Ok, there we go. Got it started.....there DONE.
Now to pull it off the styrofoam.
ARGH! They won't stand up nice and pretty like the picture.
Ok, so the copper ones are too bad but they are also small.
Not what we pictured.
The silver one won't stand up at all.
Now we have a pile of twisted wire.
Time to search Pinterest for something to work this into.....
Hopefully next time it WILL work and perhaps....
just maybe....
please....
be as easy as it looks.
Pin It

Saturday, November 24, 2012

November PTA board

Pin It
During our last PTA meeting I had everyone trace their hand and write what they were thankful for.
 It was simple but fun.
The hands became the turkey feathers.
See simple, but cute.
Now to figure out Decembers.....
Pin It

Thursday, November 15, 2012

Snowman

Pin It
I have loved getting back to my crafts (and blogging BTW)
It is even better when a project turns out. Often times a craft can be simple and finished in an hour or two but makes a statement non-the-less.
So here is one of those for you.
Of course it came from Pinterest and from Craft Goodies.
Gather your supplies:
3 foam balls (I used 5", 4" and 2" I believe)
White yarn
3 black buttons
Hot glue
Scissors
Large skewers (like shishkabobs)
and your wi-fi device to refer back here on ;-)
Now listen carefully...this part is hard. ;-)
Wind the yarn around the foam ball. Just randomly works best. Like you are making a ball of yarn. BTW: you can do this just with balls of yard but I didn't have enough yarn so I stuck with the foam balls. I would have taken a lot of yarn. Probably like 2 large scans or maybe 3. We did 2 snowmen with 1 scan of yarn. I just used a small dab of glue to hold the end of the thread.
Once all three balls are covered it's time to glue them together. I used large skewers to push thru all three balls to help add security. Then hot glue each one together.
See they come together nicely.
Now the not so fun part. UGH, wire. We learned that we don't do so well with wire. Here is a portion of our last project fail, don't worry I will show that one tomorrow.
Never fear though we are not crafters to let supplies go to waste. Take a mess of wire and somehow manage to twist it into a arm....
Like this. Yeah, not too bad eh!?! Just poke it through and glue. 
Oh, and BTW, we sprayed the wire black before we glued them in.
The hat on the other had was a tricky one. Thankfully my sister-in-law stopped by. She enjoys wire crafting and jewelry making. So here you go Misty. Work your magic.
Our wire was a bit springy but we got it to work. then I added a wire hook to the back to hang it with. Just pushed it through then added some glue to secure it. Add some burlap for the scarf....We tried both tan and red. I loved the red the best. I added a bit of pop.
See how good he looks!
Give it a try. You'll have fun creating a new holiday decoration.
Pin It

Wednesday, November 14, 2012

Melted Snowman Ornaments- 15 minute project

Pin It
I don't usually have a lot of time to craft and create so I love it when I come across a project that came be finished in those 30 minute windows between mom's taxi runs. 
This little ornament is quick and easy.
Gather your supplies (chances are most of them are already sitting out).
Glue gun with extra glue.
Jute/string/thread anytime will do.
Pony beads for eyes and mouth. (you could use anything really)
Orange pipe cleaner (I tried a orange sparkle bead, worked too)
And aluminum foil. I tried parchment paper first- didn't work.
Step #1:
Tie a little knot at the end of your string. Then start glueing. Put a bit of glue around in a melted pile. I tried just one big spot as well as going around the edges. Both worked but I like how it spread out better going around the edges. You just want to make sure it over laps so the glue runs together.
Add "2 eyes made out of coal" uhemmm, I mean two eyes of beads.
"And a button nose" made of orange pipe cleaner.
No corncob pipes here but a nice beaded mouth. Oh and here is an idea of how big the nose is. About 1/2" then fold it in half. Too long and it doesn't sit in the glue very well.
Then tuck them in the freezer. Yep, right their. Oh, move the ice cream out of the way. Between the yeast and baking soda box will do nicely. That way they will set up and pull off the foil more easily.
After about an hour use have this!
Cute melted snowman ornaments.
Just beware, little elves might move them around to help decorate their own little rooms. ;-)

Pin It

LinkWithin

Related Posts with Thumbnails