Showing posts with label crafts. Show all posts

Monday, August 25, 2014

Alec Baldwin's official approval

Pin It
My sweet hubby had a fantastic time at Comic Con this spring. This is pure heaven for any true blue nerd/geek. He had asked me back in December to make him a Jayne Cobb hat.
"A what!?" I asked.
How well he knows me. He had already found some pins and patterns for me to use. Gotta love that man. He didn't have to beg too much, just enough to make me smile. Anyway, I crocheted one for him. I thought it turned out great but only when we got the official Seal of Approval from Alec Baldwin did I hit the home run. Several other guys were dressed as Jayne Cobb with hats purchased online. Both Alec and Nathan Finnion commented to my sweet hubby specifically "nice hat!" They both said how much they liked it and asked about where he got it. He proudly informed them his wife had made it. 
He had several other guys ask if I could make them one. His response, "I don't think so."
 Yeah, only made with extra love for a special guy! Throughout the day he regularly had people comment on his hat. He even won a $30 photo voucher because of it. He was thrilled. 
This was his photo op with Alec Baldwin. He had it all planned out what to do. He got up there, handed Alec his other gun to which Alec said, "back to back?". 
"Back to back"!
Just like a kid in a candy store.
Here is the pattern I based mine off of. I made some adjustments but this was my favorite pattern. I wish I could knit but that is one thing I don't do. 
Pin It

Wednesday, April 2, 2014

Castle block

Pin It
Project 13 of 52
I love this thought. Back HERE I shared this download. Although the thought is not my original the photo and wordart are. What better time to share this than with my girls at camp. I want something simple to always remind them of their Eternal Perspective.
This is such a simple project. Just a 2x6 cut in 4inch segments then painted white. I think other colors would be wonderful too but with 30 girls to plan for I kept it simple, just one paint color to buy.
I used mod podge to attach the picture. I like the rough edges but we won't have an electric sander at camp and let's be honest, hand sanding just isn't for me. ;-p Tie it up with a bow. They have 4 different colored ribbon, teal, red, pink, yellow,  to chose from although the kits are already all together with the ribbon in them.
My mother in law has taught me that presentation of the smallest gift makes the biggest difference. So I decided to put the 'kit' together in a brown bag with a paper doilie stapled to the front. I wonder if the girls will notice but I even used my colored, pink, staples. Now I have them all together ready to go in a storage bin. I included all the supplies so nothing is forgotten and it is all in one place. 
Scouting has taught me KISMIF....Keep It Simple, Make It Fun. I think this will be a HIT! (at least I hope)
Pin It

Monday, February 10, 2014

A Jayne Cobb hat for a Sci-Fi Fan

Pin It
Project 7 of 52
So a while back my sweet hubby greeted me at this door like a kid begging for ice cream. He is a fan of the show Firefly. On it is a character named Jayne Cobb. He apparently wore this home knit hat that my sweetheart decided he wanted to wear to the next Comic-con. 
 Scene from "Firefly" (TV)
He begged me to make him one. He had even found a couple of patterns I could use (yep, he was begging). He knows how busy I am so he was ready to pull out all the stops.  Lucky for him, his wife is crafty and loves him enough to spoil him. Unlucky for him, I don't know how to knit. I tried but uhm, no, it wasn't happening. We found some crochet patterns but I liked the knit look better, I just couldn't get the hang of it fast enough. Still, the crochet pattern turned out great. I actually used 2 different patterns. The first I didn't like the earflaps on and the second I didn't like the crown portion. Here is the result...
 He was like a kid at Christmas.
 He loved it.
 Even the twisty earflaps. He said it was perfect.
Glad you like it dear.
Pin It

Wednesday, January 8, 2014

Pikichu hat #4

Pin It
Project 3 of 52
A couple of months ago I set out to make a special hat for Mr. Matthew. 
If you don't know who Pikachu is I have one word for you....
Pokemon!
The pattern I found on Pinterest only had 1 size to it but said by using different needle sizes I could easily adjust the size. Well, 4 hats later I finally got one close to his size. I had to make a few more adjustments.
The other hats all went to his brothers. I finished 3 rather quickly but you have to know that my attention span with the same craft wanes over time. By the time I'd finished 3 I just drug my feet to finish the last one.
Matthew reminded me regularly that he was still waiting for his hat. 
Finally just before Christmas I finished it!
What a happy boy he was that day! Of course then mom had to listen to "Pi-ka-CHU!" for the next couple of hours. Still, it warmed my heart that he loves his hat so much. 
Gotta love that cute little man!
~oh and the hat isn't too bad either ;-)~

Pin It

Friday, January 3, 2014

Tassle ornaments

Pin It
Project 1 of 52
One of the best parts of Christmas is decorating the tree and sharing stories with each of the ornaments. Ours are all from childhood, family trips, or significant events. Each year the boys get a new ornament, something that signals what that year was all about. This idea was perfect to add to our collection. Plus I already had bulbs waiting to be used up.
I ran into a couple of snags. My date tags are too big to get inside the bulb. I took it off and reattached it to the cap of the bulb on one and through the string on the other.
I was thrilled with these. So much better than having them collect dust in the closet, never to be seen and enjoyed. 
What a great way to share our memories of school with the boys. 
I had my tassel from college and my sweethearts from High School (still looking for the other 2)
Yep, I'd call that a Pinterest success!
Pin It

Thursday, January 24, 2013

Homemade washcloths

Pin It
Each Christmas our PTA has a Santa Shop for the kids to do some Christmas shopping of their own. The kids love it and get to learn about money and giving all at the same time. 
The problem this year was the stuff the company sent us was a lot of crap. Other items were spotted at the Dollar Store. *ugh* Really?!
So as frugal moms we said we can do better. So throughout the next year we are on the lookout for clearance items and fun gift ideas the kids can shop for. I am super excited! Just seeing the ideas and deals we have found already I think this will be the best Santa Shop ever!
Even my sweet hubby is watching out for toy deals. He picked up some great Lego sets for 1/4th the original price. SAWEET!~
I decided to focus my crafting efforts on the Santa Shop this year as well. I have several ideas and have others started.

Homemade washcloths are simple to make.
Put with a scrubbie and voila~ one great gift for mom or grandma.
They take about an hour each to make, maybe a bit more.
So during any down time; watching a movie with the family, waiting in car pool, waiting at the Dr office, waiting in car pool....I just pulled it out and do several rows. I have about 10 made already. I think I am gonna try to do about 30. It has been fun to try a couple of different patterns too. Such a  fun, easy, and portable craft. It feeds my addiction and fills a need at the same time. Perfect!
Check back for the next project next week. 
If you have any ideas I would love to hear. Just LMK! ;-)

ETA: This pattern came from a little book I picked up at Joann's but here are a couple of freebies some lovely ladies have shared. I am in love with the Waffle Crochet Spa Washcloth. It is simple and fast. Just my style!
 Waffle Crochet Spa Washcloth
Dishcloth
Pin It

Thursday, January 10, 2013

Make your own lanyards...

Pin It
While at Disneyland we decided to try the Pin Trading. You get to trade pins with all the cast members. There are soooo many you will never get bored. And if you don't get what you want there are oodles to choose from to purchase. We needed lanyards to put all our pins on and I didn't really want to buy them. So, like the self respecting, frugal crafter that I am I decided I could make some.
Lanyards really are easy to make. Just 15 minutes and you've got it. I don't use exact measurements when I craft but that is ok with these.
Gather your supplies:
Sewing machine
Ribbon
Key ring or other attachment piece
Scissors and thread Yeah, you get the point ;-)
I found this ribbon at Walmart of course and got 2 long lanyards from it. I had enough left that if I had made them a bit shorter I could have gotten 3. Just placed the ribbon around your neck to determine it's length. Remember to adjust for any little ones you will be making them for.
 Grab your key ring or whatever attachment do-dad you are using and thread the ribbon through it then sew a strong seam. This will be pulled on a bit so make sure to sew it well.
Use some pinking scissors to keep the end from fraying. If you are lucky enough to have a serger YEAH! Just serge the end before you fold it over the ring.
 
 Perfect! Just a couple of minutes and now you are ready to add your favorite pins.
This is Mr. Matthews. Can you tell who his favorite characters are?
Pin It

Tuesday, November 27, 2012

Wire Trees

Pin It
A Pinterest Fail!
We had good intentions.
The pin looked so EASY.
No Problem we thought.
We picked up all the supplies we needed....
BTW: Copper wire is a bit pricey....
And got started making our own set of wire wreaths.
Just wrap them around the styrofoam cone.
Ok, uhm wait, like this? Oops, let's try that again...ugh, this is harder than it looks.
The wire is kinda digging into the styrofoam....
Ok, there we go. Got it started.....there DONE.
Now to pull it off the styrofoam.
ARGH! They won't stand up nice and pretty like the picture.
Ok, so the copper ones are too bad but they are also small.
Not what we pictured.
The silver one won't stand up at all.
Now we have a pile of twisted wire.
Time to search Pinterest for something to work this into.....
Hopefully next time it WILL work and perhaps....
just maybe....
please....
be as easy as it looks.
Pin It

Thursday, November 15, 2012

Snowman

Pin It
I have loved getting back to my crafts (and blogging BTW)
It is even better when a project turns out. Often times a craft can be simple and finished in an hour or two but makes a statement non-the-less.
So here is one of those for you.
Of course it came from Pinterest and from Craft Goodies.
Gather your supplies:
3 foam balls (I used 5", 4" and 2" I believe)
White yarn
3 black buttons
Hot glue
Scissors
Large skewers (like shishkabobs)
and your wi-fi device to refer back here on ;-)
Now listen carefully...this part is hard. ;-)
Wind the yarn around the foam ball. Just randomly works best. Like you are making a ball of yarn. BTW: you can do this just with balls of yard but I didn't have enough yarn so I stuck with the foam balls. I would have taken a lot of yarn. Probably like 2 large scans or maybe 3. We did 2 snowmen with 1 scan of yarn. I just used a small dab of glue to hold the end of the thread.
Once all three balls are covered it's time to glue them together. I used large skewers to push thru all three balls to help add security. Then hot glue each one together.
See they come together nicely.
Now the not so fun part. UGH, wire. We learned that we don't do so well with wire. Here is a portion of our last project fail, don't worry I will show that one tomorrow.
Never fear though we are not crafters to let supplies go to waste. Take a mess of wire and somehow manage to twist it into a arm....
Like this. Yeah, not too bad eh!?! Just poke it through and glue. 
Oh, and BTW, we sprayed the wire black before we glued them in.
The hat on the other had was a tricky one. Thankfully my sister-in-law stopped by. She enjoys wire crafting and jewelry making. So here you go Misty. Work your magic.
Our wire was a bit springy but we got it to work. then I added a wire hook to the back to hang it with. Just pushed it through then added some glue to secure it. Add some burlap for the scarf....We tried both tan and red. I loved the red the best. I added a bit of pop.
See how good he looks!
Give it a try. You'll have fun creating a new holiday decoration.
Pin It

Wednesday, November 14, 2012

Melted Snowman Ornaments- 15 minute project

Pin It
I don't usually have a lot of time to craft and create so I love it when I come across a project that came be finished in those 30 minute windows between mom's taxi runs. 
This little ornament is quick and easy.
Gather your supplies (chances are most of them are already sitting out).
Glue gun with extra glue.
Jute/string/thread anytime will do.
Pony beads for eyes and mouth. (you could use anything really)
Orange pipe cleaner (I tried a orange sparkle bead, worked too)
And aluminum foil. I tried parchment paper first- didn't work.
Step #1:
Tie a little knot at the end of your string. Then start glueing. Put a bit of glue around in a melted pile. I tried just one big spot as well as going around the edges. Both worked but I like how it spread out better going around the edges. You just want to make sure it over laps so the glue runs together.
Add "2 eyes made out of coal" uhemmm, I mean two eyes of beads.
"And a button nose" made of orange pipe cleaner.
No corncob pipes here but a nice beaded mouth. Oh and here is an idea of how big the nose is. About 1/2" then fold it in half. Too long and it doesn't sit in the glue very well.
Then tuck them in the freezer. Yep, right their. Oh, move the ice cream out of the way. Between the yeast and baking soda box will do nicely. That way they will set up and pull off the foil more easily.
After about an hour use have this!
Cute melted snowman ornaments.
Just beware, little elves might move them around to help decorate their own little rooms. ;-)

Pin It

Monday, November 5, 2012

How to fix a styrofoam wreath tutorial

Pin It
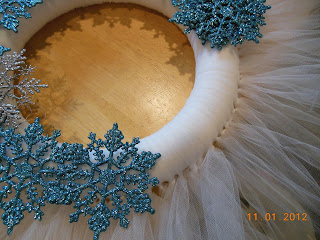
My wonderful sister gave me a great start to a wreath we had planned on making together but never got around to it. She started with the basic styrofoam wreath and tied tulle to it. There is lay, waiting for the holiday decor so I could get the snowflakes to add to it. Along came a couple of curious little boys. "Here Ty, put this on."
 "OK!"....
Yeah, not such a bright idea!! You all know what happened. Mom came home. Dad made the boys fess up. ARGH!! Life with boys sometimes makes me shake my head!!
*deep cleansing breath*
I thought I was going to have to untie everything and start over until my sweet mom told me they have styrofoam glue.
FANTASTIC!!
Actually, it's FOAMTASTIC!

Just put a couple of toothpicks in place to help hold it until the glue dries.
A little army of good guys to watch over helps the glue dry faster....it's true!
The glue is suppose to dry in about an hour but I was able to carefully slide the tulle around where it belonged without problems. The toothpicks help to hold everything in place until all is dry.
Then, layout your snowflakes. I got the blue ones from Hobby Lobby and the silver from Walmart. I have heard the dollar store have these as well. Mine were only about $3 for a big box. There are enough snowflakes left for another wreath.
Use a bit of hot glue to glue the flakes down.
When you are done with the first ring of blue snowflakes start again with the silver ones.
 Just a couple of dabs of glue will do.
 It looks fantastic....uhm white on white.....let's try again....
 Ahhh, that's better!
 Something fun for the coming winter.
Thanks sis for getting the hard part done for me!
Sharing at these great blogs:

toastie studio
Organize and Decorate Everything
Pin It

LinkWithin

Related Posts with Thumbnails