Showing posts with label decor. Show all posts

Monday, February 25, 2013

Palet Ottoman tutorial

Pin It
A couple of months ago I snatched onto a great rectagle palet from work. I was beautiful! The wood looked great but more importantly the top was almost solid. I knew right away it would be the perfect project. I had decided it would become an ottoman.
Now my problem was finding the right fabric and getting the foam. Thankfully both were on sale this last weekend at JoAnn's. So my Presidents day was spent buidling my new ottoman. It turned out fantastic. I really like it but my boys love it- all 5 of them! ;-)
There are several tutorials on Pinterest. Here is what I did.

Step 1: I used spray insulatin foam around the edges. I didn't want to feel the wood pressing through the edges of the foam. The insulation foam said it would take 8 hrs to set but it was good to go after just a couple of hours. I was really glad. I didn't know how long my boys would resist the temptation to play on it again. It was too cold to put outside.
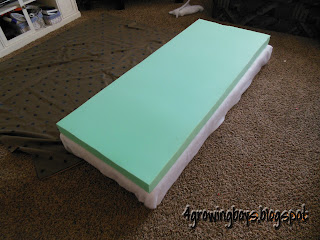
Step 2: After the insulating foam came the batting. I just used some remnant batting to put over the top and around the edges. Then I placed the camping foam on top of that. One side note: I bought a foam pad by the yard at Joann's but it is much cheaper to use a mattress foam pad. Yeah, a DUH! moment.
Step 3: turn the palet upside down on your fabric.
Step 4: Stretch the fabric tight and staple it to the bottom.
Work all the way around. For each side I started in the middle and worked my way out.
Step 5: I used some left over canvas to finish off the bottom. I love the clean underside.
See, so much better than the rough edges of wood and fabric.
Step 6: Add the plates for the feet. Home depot to the rescue.
Step 7: Screw on your feet. I haven't done anything to finish mine yet. I couldn't decide how to finish them or whether to just leave them natural....
Step 8: sit back and enjoy your new furniture! My boys love this new addition.
I think decided to paint the feet red. What do you think?
Pin It

Tuesday, February 19, 2013

Ahh a new faucet

Pin It
I have a wishlist of great things to do in my home. Most of them fall into the "want" category more than the "need" so in our endevor to be frugal and debt free they generally remain low on my shopping list...VERY LOW.
That is why I have come to love getting gift cards.
For Christmas we were given several gift cards to Home Depot. I asked my sweet hubby what he thought we should use them for. Something practical like adding to the supplies to finish the basement? Tools? Organizing supplies? Gardening gear? What?
Can you imagine my thrill when he said to get the new faucet we have been eyeing for a while!!! We have wanted it but could never justify the cost when our current (boring) faucet worked just fine. Now...well now I am wearing a smile whenever I walk into my kitchen. Who knew a faucet could make me so happy. But it is SOO pretty!!
 See, basic builders grade (ultra boring) faucet....
 Sweetest man who knows just how to make his wife happy!
Ahhh, new stylish, functional, lovely faucet.
Truth be told, sweet hubby comments all the time how much he likes the new faucet.
Thanks family and friends for the gift cards for a "want" item making us very happy!
Pin It

Thursday, December 13, 2012

Window lights secret revealed....

Pin It
I love Christmas! I do! I love everything about this time of year, the hustle, the bustle, the jingle bells, presents, and the LIGHTS!

My sweet hubby has learned by now that one thing that is sure to score him some brownie points is helping put up the lights. He does the outside while I do this inside.

I remember as a little girl laying at the foot of my top bunk bed and falling asleep to the flashing of the lights outside. We always put lights inside our windows too. It took at least a roll of tape per window to get those lights to stick to the frost covered windows.

Thankfully we don't have to use quite so much tape anymore. Just a few strategically placed clips and voila...you have great window lights.
My secret?
Command hooks. Yep, I love 'em!
I found these small clear clips this year. You hardly even see them.
They hook to the wire which helps if you have to adjust a bit. I used 8 on each window pane.
Just stick them to to window then clip the wire in. They are really strong. Then come off easily after the holidays. I used them last year too but I love the smaller size of these. Definently worth the couple bucks.
Plus you just get new sticky tabs and reuse the hooks next year.....hmmm I should buy stock in command hooks. I use them all the time.
(I received no compensation for this, just my $0.02 worth ;-)
Pin It

Monday, November 5, 2012

How to fix a styrofoam wreath tutorial

Pin It
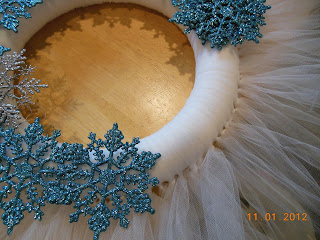
My wonderful sister gave me a great start to a wreath we had planned on making together but never got around to it. She started with the basic styrofoam wreath and tied tulle to it. There is lay, waiting for the holiday decor so I could get the snowflakes to add to it. Along came a couple of curious little boys. "Here Ty, put this on."
 "OK!"....
Yeah, not such a bright idea!! You all know what happened. Mom came home. Dad made the boys fess up. ARGH!! Life with boys sometimes makes me shake my head!!
*deep cleansing breath*
I thought I was going to have to untie everything and start over until my sweet mom told me they have styrofoam glue.
FANTASTIC!!
Actually, it's FOAMTASTIC!

Just put a couple of toothpicks in place to help hold it until the glue dries.
A little army of good guys to watch over helps the glue dry faster....it's true!
The glue is suppose to dry in about an hour but I was able to carefully slide the tulle around where it belonged without problems. The toothpicks help to hold everything in place until all is dry.
Then, layout your snowflakes. I got the blue ones from Hobby Lobby and the silver from Walmart. I have heard the dollar store have these as well. Mine were only about $3 for a big box. There are enough snowflakes left for another wreath.
Use a bit of hot glue to glue the flakes down.
When you are done with the first ring of blue snowflakes start again with the silver ones.
 Just a couple of dabs of glue will do.
 It looks fantastic....uhm white on white.....let's try again....
 Ahhh, that's better!
 Something fun for the coming winter.
Thanks sis for getting the hard part done for me!
Sharing at these great blogs:

toastie studio
Organize and Decorate Everything
Pin It

Saturday, November 3, 2012

Homemade Haunted Forest

Pin It
Here is the follow up to our trip up the canyon....
 I saw this pin on Pinterest and thought, sure that would be easy.
Well, it wasn't hard per se but it still didn't quite hit the mark. 
We picked our branches.
Touched them up with some black spray paint.
I tried to plant them in flower pots but the pots were not big enough....
So we staked them in the ground with the help of locking ties.
Then wrapped the lights around them.
The only problem was they didn't look quite right. They didn't want to stand up. Of course little boys whacking at them didn't help either. I think more would have been better or perhaps a different layout.
Over all, not too bad but I will likely skip this step next Halloween. Instead I will add lights to the real tree out front.
Pin It

Thursday, November 1, 2012

4x4 Snowmen

Pin It
My sweet friend and I finally got to craft again. We have both missed our crafting days so much. For me they help to keep me grounded. I love having a day I can create. A day to beautify my home. A day to be with friends. Yeah, mom's need that too!
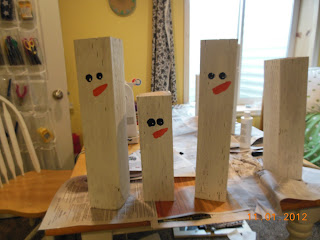
 I took advantage of the leftover 4x4's from the deck.
Simply paint them white. 
I wanted a rough look so 1 coat did just dandy.
Then a dab of black for the coal eyes.
And something to resemble a carrot nose. I am not much of a painter so this added to the "rough" feel.
The scarves were just a 3 inch strip of fabric.
Then I measured around the 4x4's. They were about 14 inches around.
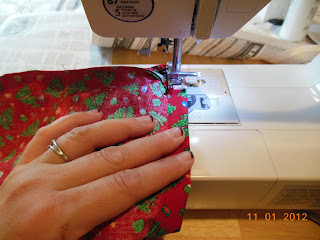
A simple rectangle that was 14 inches wide, seamed together, the a slight hem at one end gave me a nice little hat.
I tied it with a bit of ribbon then snipped the top end to give a fringed look.
Using a sharpie I added eyelashes and eyebrows and accented the carrot nose. 
I love them! They were simple and turned out great. 
This weekend I hope to get the Halloween down and these cuties out on the front step. 
My favorite holiday is just around the corner. Horray!
*sigh*
Days like this are wonderful to the soul!

Pin It

Wednesday, June 20, 2012

Americana Burlap Wreath

Pin It
My sweet friend mentioned she wanted a wreath for her front door...ok she actually mentioned it several times. We had pinned a Patriotic Wreath we both really liked. After a bit of thought, the cogs started to turn....I wonder?! Yep, I've got a wreath. Ohh, and we can use this star. And finally something to redo this garland with. Here's just enough burlap left. This flag was losing some of it stick anyway, not to mention looking a bit weather worn- just perfect for our next project.
I LOVE it! We wrapped the burlap around then the garland. Now some way to keep the star in place....how about some jute twine. I soaked the flag in tea (black tea works better but I only had herbal) to turn it a bit yellow.
VOILA!
One amazing wreath made with supplies already on hand. 
Hmmmm, I wonder if I should have kept it for myself?
Looks wonderful huh!
Yep, Ms. Kaylyn loved it too. She didn't even put up too much of a fight when I told her to hang it on HER door. Yeah, it was a sure fire give away she was head over heels in love with this little project.
It looks perfect on her front door. Warm, inviting, and patriotic. You just can't get more American than a little boy in blue heading home.
Pin It

Tuesday, June 19, 2012

Burlap Americana Banner

Pin It
I saw this pattern at my sisters house, loved it, then loved it more when I realized I had everything waiting for me at home. 

 The burlap was for some other project long forgotten. Now I had new life to give it. Thanks to my cricut I cut vinyl stars then used painters tape for the stripes.
Then we headed out to the driveway to spray paint.
I happen to have metallic blue, it was perfect. Just a hint of sparkle for the stars.
Red stripes with the soft brown burlap showing through.
In the end....It was a great hit. I love it. My front door decor is coming together. I have a hard time with garlands around the door although I absolutely love them.
Burlap and the old Red, white and blue....classic Americana.


Pin It

Monday, May 14, 2012

Temple Picture

Pin It
My dear friend just celebrated her 13th birthday. Her first and most wanted gift was a framed copy of my temple picture. Made my day to hear that. So we set off to make it for her. I had an old frame. We took the picture out of it and added trim of our own so we had a chunky frame.
I used metalic spray paint to paint the mat from blue to gold.
The frame was a bit uncooperative but we got it to work out.
The great thing about shabby chic look right now is it hides any imperfections in the building process.
In the end we loved it. Glue the trim all together, rough up the edges, finish off with a sealer and
Voila!
Oh, and Ms. Katlyn loved it too! Happy Birthday Katlyn!
Pin It

LinkWithin

Related Posts with Thumbnails