Wednesday, November 28, 2012

No more photo space.......

Pin It
I just ran into a problem I hadn't expected (guess I should have), I have no more photo space left. Apparently uploading photos to my blog saves them with a Picasa account but you only get 1GB free. Now I have to change something to continue to upload pictures. *sigh*

I don't make any money from my blog, I just enjoy doing it. There is just something about seeing all you guys that are interested in seeing what I have to say or the latest project I have running. 

Anyway, does anyone have tips or suggestions? What is the best direction to take from here?
HELP???
Pin It

Tuesday, November 27, 2012

Wire Trees

Pin It
A Pinterest Fail!
We had good intentions.
The pin looked so EASY.
No Problem we thought.
We picked up all the supplies we needed....
BTW: Copper wire is a bit pricey....
And got started making our own set of wire wreaths.
Just wrap them around the styrofoam cone.
Ok, uhm wait, like this? Oops, let's try that again...ugh, this is harder than it looks.
The wire is kinda digging into the styrofoam....
Ok, there we go. Got it started.....there DONE.
Now to pull it off the styrofoam.
ARGH! They won't stand up nice and pretty like the picture.
Ok, so the copper ones are too bad but they are also small.
Not what we pictured.
The silver one won't stand up at all.
Now we have a pile of twisted wire.
Time to search Pinterest for something to work this into.....
Hopefully next time it WILL work and perhaps....
just maybe....
please....
be as easy as it looks.
Pin It

Saturday, November 24, 2012

November PTA board

Pin It
During our last PTA meeting I had everyone trace their hand and write what they were thankful for.
 It was simple but fun.
The hands became the turkey feathers.
See simple, but cute.
Now to figure out Decembers.....
Pin It

Thursday, November 15, 2012

Snowman

Pin It
I have loved getting back to my crafts (and blogging BTW)
It is even better when a project turns out. Often times a craft can be simple and finished in an hour or two but makes a statement non-the-less.
So here is one of those for you.
Of course it came from Pinterest and from Craft Goodies.
Gather your supplies:
3 foam balls (I used 5", 4" and 2" I believe)
White yarn
3 black buttons
Hot glue
Scissors
Large skewers (like shishkabobs)
and your wi-fi device to refer back here on ;-)
Now listen carefully...this part is hard. ;-)
Wind the yarn around the foam ball. Just randomly works best. Like you are making a ball of yarn. BTW: you can do this just with balls of yard but I didn't have enough yarn so I stuck with the foam balls. I would have taken a lot of yarn. Probably like 2 large scans or maybe 3. We did 2 snowmen with 1 scan of yarn. I just used a small dab of glue to hold the end of the thread.
Once all three balls are covered it's time to glue them together. I used large skewers to push thru all three balls to help add security. Then hot glue each one together.
See they come together nicely.
Now the not so fun part. UGH, wire. We learned that we don't do so well with wire. Here is a portion of our last project fail, don't worry I will show that one tomorrow.
Never fear though we are not crafters to let supplies go to waste. Take a mess of wire and somehow manage to twist it into a arm....
Like this. Yeah, not too bad eh!?! Just poke it through and glue. 
Oh, and BTW, we sprayed the wire black before we glued them in.
The hat on the other had was a tricky one. Thankfully my sister-in-law stopped by. She enjoys wire crafting and jewelry making. So here you go Misty. Work your magic.
Our wire was a bit springy but we got it to work. then I added a wire hook to the back to hang it with. Just pushed it through then added some glue to secure it. Add some burlap for the scarf....We tried both tan and red. I loved the red the best. I added a bit of pop.
See how good he looks!
Give it a try. You'll have fun creating a new holiday decoration.
Pin It

Wednesday, November 14, 2012

Melted Snowman Ornaments- 15 minute project

Pin It
I don't usually have a lot of time to craft and create so I love it when I come across a project that came be finished in those 30 minute windows between mom's taxi runs. 
This little ornament is quick and easy.
Gather your supplies (chances are most of them are already sitting out).
Glue gun with extra glue.
Jute/string/thread anytime will do.
Pony beads for eyes and mouth. (you could use anything really)
Orange pipe cleaner (I tried a orange sparkle bead, worked too)
And aluminum foil. I tried parchment paper first- didn't work.
Step #1:
Tie a little knot at the end of your string. Then start glueing. Put a bit of glue around in a melted pile. I tried just one big spot as well as going around the edges. Both worked but I like how it spread out better going around the edges. You just want to make sure it over laps so the glue runs together.
Add "2 eyes made out of coal" uhemmm, I mean two eyes of beads.
"And a button nose" made of orange pipe cleaner.
No corncob pipes here but a nice beaded mouth. Oh and here is an idea of how big the nose is. About 1/2" then fold it in half. Too long and it doesn't sit in the glue very well.
Then tuck them in the freezer. Yep, right their. Oh, move the ice cream out of the way. Between the yeast and baking soda box will do nicely. That way they will set up and pull off the foil more easily.
After about an hour use have this!
Cute melted snowman ornaments.
Just beware, little elves might move them around to help decorate their own little rooms. ;-)

Pin It

Wednesday, November 7, 2012

Mason Jars+Cupcake wrappers=Organized!

Pin It
 What a mess. I hate getting into the cupboard for 1 thing and having 10 come out. I have been wanting to do something about this for a while. Yesterday, I broke down and took 5 minutes to do just that.... 
Take 1 pile of cupcake wrappers
 1 wide mouth mason jar....
 Place wrappers inside. Nice, neat, and tidy...
Put the lid on it nice and snug and VOILA! No more jumbled mess.
Ahhh, I feel better already!
Pin It

Tuesday, November 6, 2012

A fun way to give money

Pin It
 Our oldest just turned 13. He is a simple kid and didn't want much. 
Dad took care of the toy gifts (he is perfect for shopping for boys toys ;-p)
He does however enjoy a bit of money to spend for himself.
So I took the 'money' into my own hands. 
$1 bills taped together in a long string....
 Rolled all up nicely...
 Then a little packing filler. We had this bubble pack that worked wonderfully...
 Add it to a kleenex box. See it tucked in there nice and snug?.....
Now add your roll of $1 bills....And VOILA! a fun little way to give some cash.
Just wrap the tissue box and you are ready to go!
Pin It

Monday, November 5, 2012

How to fix a styrofoam wreath tutorial

Pin It
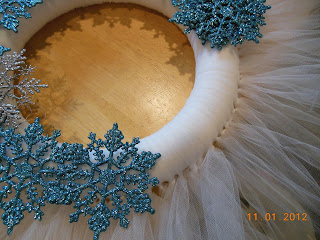
My wonderful sister gave me a great start to a wreath we had planned on making together but never got around to it. She started with the basic styrofoam wreath and tied tulle to it. There is lay, waiting for the holiday decor so I could get the snowflakes to add to it. Along came a couple of curious little boys. "Here Ty, put this on."
 "OK!"....
Yeah, not such a bright idea!! You all know what happened. Mom came home. Dad made the boys fess up. ARGH!! Life with boys sometimes makes me shake my head!!
*deep cleansing breath*
I thought I was going to have to untie everything and start over until my sweet mom told me they have styrofoam glue.
FANTASTIC!!
Actually, it's FOAMTASTIC!

Just put a couple of toothpicks in place to help hold it until the glue dries.
A little army of good guys to watch over helps the glue dry faster....it's true!
The glue is suppose to dry in about an hour but I was able to carefully slide the tulle around where it belonged without problems. The toothpicks help to hold everything in place until all is dry.
Then, layout your snowflakes. I got the blue ones from Hobby Lobby and the silver from Walmart. I have heard the dollar store have these as well. Mine were only about $3 for a big box. There are enough snowflakes left for another wreath.
Use a bit of hot glue to glue the flakes down.
When you are done with the first ring of blue snowflakes start again with the silver ones.
 Just a couple of dabs of glue will do.
 It looks fantastic....uhm white on white.....let's try again....
 Ahhh, that's better!
 Something fun for the coming winter.
Thanks sis for getting the hard part done for me!
Sharing at these great blogs:

toastie studio
Organize and Decorate Everything
Pin It

LinkWithin

Related Posts with Thumbnails